Remember More Book Details in 10 Minutes Than You Used to in an Hour
Have you ever binge-read a book, only to forget literally everything by the next weekend?
Or maybe you took 17.5 business months to finish a novel, and now you couldn’t recall the plot or characters if there was a cash prize involved?
If you’re nodding right now, you’re not broken, I promise. You just need to interact with whatever you’re reading to make it stick.
By the end of this post, you’ll have a simple, zero-overwhelm system for annotating that will make your reading memories as sticky as glitter on a craft table. Your annotation toolkit wouldn’t be complete without part 1 (read it here, if you missed it). Ready to go further with annotations? Make sure to read parts 3 and 4, too!
P.S.: This advice is geared toward fiction lovers. If you’re a nonfiction reader, drop a comment and I’ll whip up a separate annotation guide just for you.
Want a quick (free) overview of annotating, and a printable, bookmark-style annotation cheat sheet?

Why Annotating Works
When you engage different parts of your brain while reading, you’re way more likely to remember what you read.
Annotation is visual (you see it), kinesthetic (you physically interact with it), and emotional (you feel it) — which means multiple brain systems are working together to store that memory.
The benefits? You can re-read faster, recall details without flipping through pages, and make richer, more meaningful connections to what you’re reading — because it actually sticks.
Neuroscience time
- When you make a note about what you read, your brain is forced to summarize what you just read, so your memory is instantly strengthened.
- Pairing words (the book) with visuals (your annotations) doubles the likelihood of your brain remembering the information.
- Thinking about the why behind the text makes it stick way longer than skimming ever will.
- Rewriting a quote in your own words builds new memory connections.
- Adding your reactions locks emotional scenes into your memory.
What You’ll Need
As an English teacher, I’m a sucker for a good school supply. If you love office supplies as much as I do, just thinking about all the annotation tools you “need” is enough to get your blood pumping.
Highlighters
Get a good set that won’t bleed through the page.
- My ride-or-die: These Zebra Midliner pastel highlighters are my absolute favorite on the planet.
- Runner-up: These Mr. Pen gel highlighters — great colors, essential for thin bible pages, but not as precise for tiny text.
Sticky Notes
Pick a color you love and stick to it (pun intended).
- Amazon just told me I’ve purchased this set of sticky notes 4 other times, so I clearly love them.
- I’ve started to enjoy clear sticky notes. These are the only ones I’ve tried and liked, and I think they are the best because they come in a bunch of subtle colors and don’t rip, tear the paper, or smear like the others do.
Writing Utensils
Pen vs. pencil is totally personal preference.
- The pens I love: Acid-free, no bleed, cheap, smooth as butter.
- The only pencils I tolerate: but only if I have to use pencil.
Tabs (optional)
Think of tabs as your quick-flip GPS.
- I mark any chapters or sections I’ll want to find fast.
- I usually don’t use tabs until I’m done reading the book and start to review my annotations.
- Big uses: character descriptions, major conflicts, or any “must reference later” moments.
These Mr. Pen tabs are my favorite book tabs to use.
A Note on “Pretty” Annotations
I love a good aesthetic as much as anyone, but making annotations Pinterest-perfect can triple your reading time. Plus, you need a flat surface, good light, and a full craft store’s worth of pens.
If that sparks joy for you — do it! But for my own pleasure reads, I keep it simple:
No grad-school-level notes
Just practical marks so I can keep enjoying the story.
Simplify your pack
One pen, one highlighter, one stack of sticky notes.
No color codes
Pastel colors (only), no pattern to memorize.
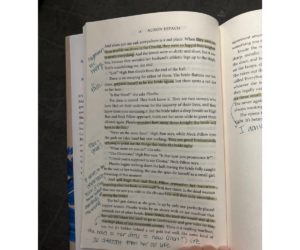
my one pen, one highlighter, no fuss annotation method in action
How to Make Your Annotations Work Harder
If you’re going to take the time to mark up your book, you might as well get maximum brain-boosting power out of it. Here are three ways to level up your annotation game:
1. Color-Code Your Categories
Give each type of note its own color so your brain can instantly scan for what you need.
- Example system: Yellow = quotes, pink = themes, blue = questions, green = character development.
- Don’t overthink it — 3–4 colors is plenty. (Otherwise, you’ll spend more time flipping highlighters than actually reading.)
- I personally just switch colors between chapters so I don’t get bored, because color coding takes too much time for me to stop reading, figure out which color I’m using for what I’m noticing… yuck.
2. Use Sticky Tabs for Quick Reference
Tabs are your book’s built-in GPS. They make it ridiculously easy to flip straight to the part you need without frantically skimming.
- Use different colors or shapes for different purposes — plot twists, character intros, important symbols, etc.
- Bonus: most tabs are removable, so you can reuse your book without permanent marks if you ever lend it out. If you need your to be removable, check the tabs you have before putting them everywhere!
3. Summarize Each Chapter
At the end of a chapter, jot a 1–2 sentence recap right in the margin, on a post it note, or in a separate reading journal.
- This helps you cement what you just read and gives future-you a quick refresher.
- Reading digitally? Use the notes feature in your Kindle or app.
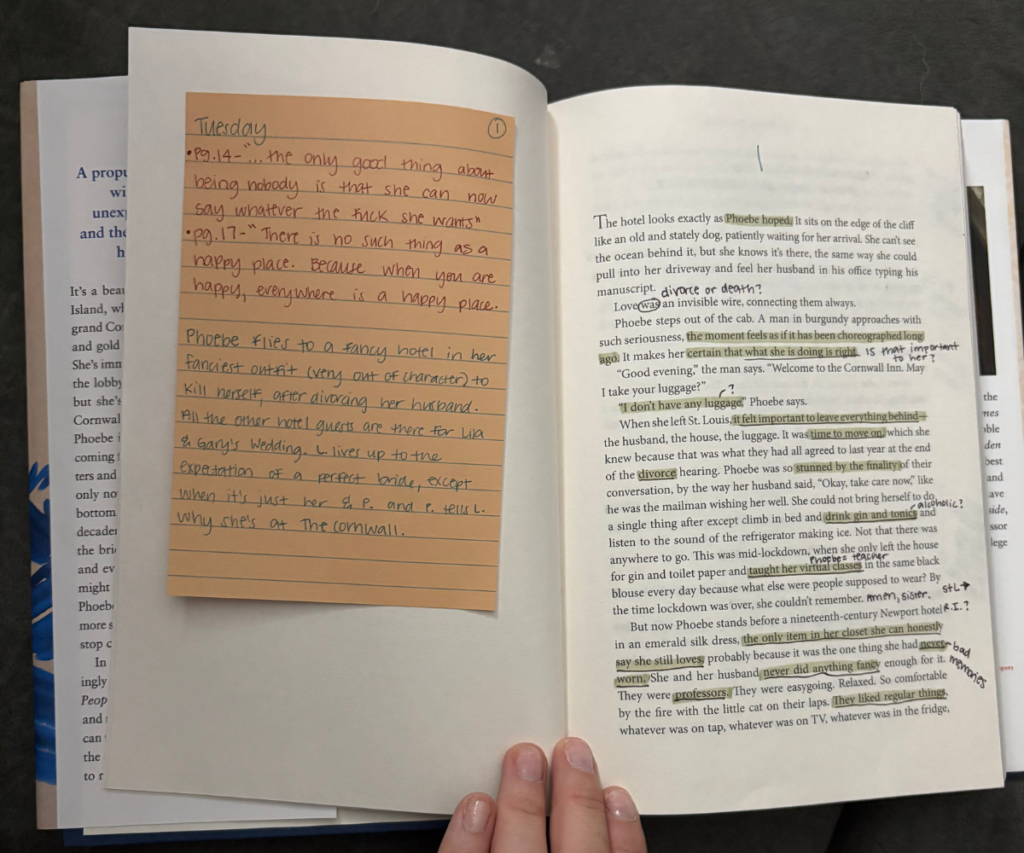
- I do this on a large lined post it and I (typically) do a summary after each chapter, then stick it in the first page of that chapter – I included an example of my summary post it of chapter 1 of The Wedding People, by Alison Espach.
Annotations in Action:
Summary Note & Annotation Example
Is this annotation method perfect? Probably not.
Did my annotations always look like this? Also no.
Annotations are an ever-evolving, personalized, and highly optional (but super helpful) art form.
Pro Tip:
You don’t have to do all three of these for every book. Pick the one or two that feel natural and add the others over time. Annotation is supposed to help you — not turn your cozy reading session into a research project.

Digital vs. Physical Annotation
Not all annotators are pen-and-paper people like I am, and that’s okay.
Whether you love the smell of fresh paper or the convenience of a screen, there’s a way to make your annotations work for you.
Pick the method you’ll actually stick with.
The “best” system is the one you use consistently — whether that’s color-coded sticky tabs or a Kindle full of neatly highlighted passages.
Physical Annotations
Pros: Tangible, creative, and satisfying (there’s something magical about writing in the margins or slapping in a sticky tab).
Cons: Not easily searchable, and you can’t carry your whole library in your purse unless you’re training for the world’s weirdest strongman competition.
Best for: Readers who love the feel of a book in hand and want to slow down to interact with the text.
Digital Annotations*
Pros: Searchable, portable, and perfect for people who want their notes in one place without hauling around multiple books.
Cons: Less tactile satisfaction, and sometimes it’s too easy to highlight everything and never revisit it.
Best for: Readers who want efficiency, easy access, and no risk of losing their place because the sticky tab fell out.
*Digital Annotations can include: Kindle highlights, Fable or Goodreads notes, Notion databases, even Google Docs.
Hybrid Systems
Some readers mix and match — highlight or tab key moments in a physical copy, then log major takeaways in a digital tool for easy reference.
- Example: Annotate your paperback with sticky notes during reading, then type the big insights into a Notion page or Goodreads review afterward.
- Why it works: You get the emotional and tactile benefits of physical annotation and the searchable convenience of digital notes. Also, if you’re borrowing a book from a friend or the library, you won’t have to keep track of a stack of sticky notes – your notes will be digital and able to be saved long after returning the book!
Building a Personal Annotation Style
Annotation isn’t one-size-fits-all. The way you mark up your books should match your reading personality — whether that’s a minimalist “barely-touch-the-page” vibe or a maximalist “this book is now a rainbow explosion” approach.
Do you…
- …stick to a single pen or highlighter?
- …only mark what’s absolutely necessary?
- …only note when you find a key quote?
- …want to write down when you find a big turning point?
You might be a minimalist.
- You likely want to stay immersed in the story.
- Pausing every five seconds to write would be tedious and obnoxious, in your mind.
- …use multiple colors for multiple categories of notes and things you notice?
- …find that your margins are full of scribbles, reactions, notes, drawings, and commentary?
You are likely a maximalist.
- You love turning books into fully personalized keepsakes that you save on your shelves for years to come.
- You’re also my kind of people! I love maximalist annotations… I just get burnt out and distracted when I try to do them.
As with almost anything you’re trying to make a habit of, our goal when annotating is building a system you’ll actually use consistently.
Conclusion
If you want reading to be an enjoyable, remember-able, engaging experience, annotating what you read is a great option. Engaging with what you read on a deeper level helps stories stick in your brain, and in your soul.
My last advice for you is to start small. Begin with a single pen and three things you want to look for as you read, and then build your own system naturally over time.
I’d love to see how you annotate.
Share a snapshot of your marked-up pages or post your system online and tag me @bookclubteacher on Instagram.